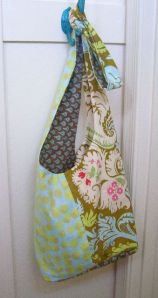
The Boho Sling Bag – plain or fancy. A sewing project for everyone – regardless of their sewing pedigree or experience!
The Boho Sling Bag seems to be fairly popular among those that could form the next generation of needle-artists. It would make a great first project to start their sewing careers!
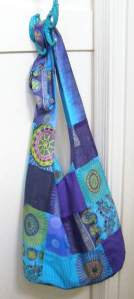
This Tutorial starts with the “plain” bag. The few extra steps required to create the Patch Bag are found here.
Just a few items are required to make the Boho Sling Bag. Some fabric, a sewing machine, thread, scissors, and an iron.
About the fabric: I have a HUGE STASH of fabric (thus “The Destashification Project”), but if selecting fabrics require purchase, here are some suggestions.
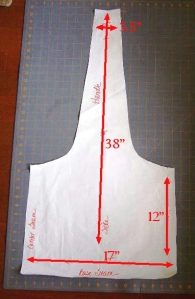
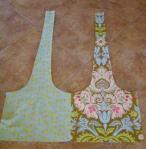
The purse requires four of the pieces shown in the pattern sketch. The pattern sketch is drawn on a 1″ grid so it may be sketched or click here for a downloadable pattern that may be printed and enlarged.
Four pieces are needed because two for the outside of the bag and two for the lining.
Each piece requires approximately 1/2 yard of 45″ wide fabric. If a fat quarter catches your eye, I have included instructions for piecing so they may be used here.
Two purse bases (the bottom of the purse) will also require two 8 by 12″ rectangles (download the pattern for boho bag base here – no enlargement required) and the inside pocket requires another rectangle that is 18″ by 13″.
One yard of fabric will be enough for one bag piece, the bases and the pocket.
To give some structural stability to the purse (so it is not flat) the lining purse base is strengthened with a 8″ by 12″ piece of felt/quilt batting/old mattress pad/washcloth, towel, etc.
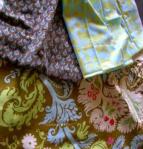
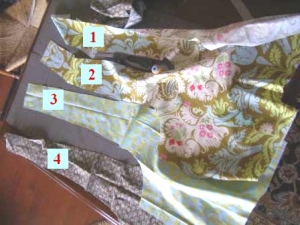
Cut out the four bag pieces. We will be working first with the two pieces for the lining. The lining of the bag pictured above is made from the pieces numbered 1 and 4 in the photo.
But even before working with the lining, we will prepare the pocket.
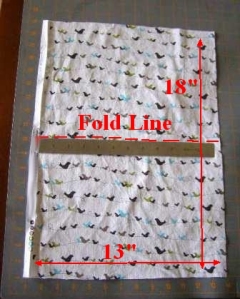
Cut out a pocket using the pattern included with the bag pattern or just measure an 18″ by 13″ rectangle.
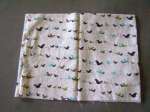
Fold along fold line shown in Photo 1 – RIGHT SIDES together.
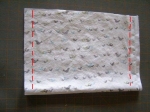
Sew along two shorter sides as shown in Photo 2. Use 1/2″ seam allowance.
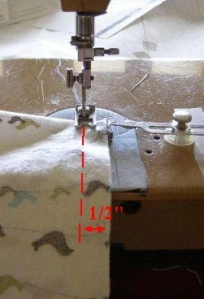
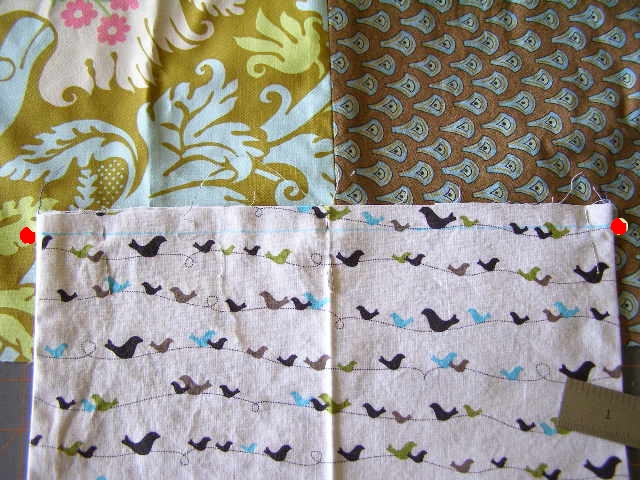
Photo 3 illustrates a 1/2″ seam allowance. The 1/2″ is measured between the stitching and the cut edge of the fabric. Most sewing machines will have a tool such as the “arm” looking device that is screwed into the sewing machine that assists keeping a nice even seam allowance.
Clip corner edge of seam as shown in Photo 4. It will help produce a nice even corner.
Turn pocket right aside out and iron.
Fold pocket by bringing the two seams together and press to make a center line as shown in Photo 5. Set aside.
Take two bag lining pieces and place them RIGHT SIDES together.
Sew two lining pieces together along ONE side seam using a 1/2″ seam allowance as shown in Photo 6.
Press seam open as shown in Photo 7.
Lay linings flat on table with right side facing up.
Place pocket on RIGHT SIDE of Linings, so that upper folded edge is approx. 1.5″ from top edge of lining and pressed centerline of pocket is aligned with the side seam – as shown in Photo 8.
Place a pin at each of the red dots. The pins should be placed in the lining, 1/2″ from the lower edge of the pocket.
Flip the pocket upside down (unsewn or “raw” edge upward) as shown in Photo 9. The raw edge should extend 1/2″ above the pins located at the red dot positions.
Using a pencil or a disappearing marker (they are soooo cool!) draw a line on the pocket connecting the two red dot pins. This will be the sewing line.
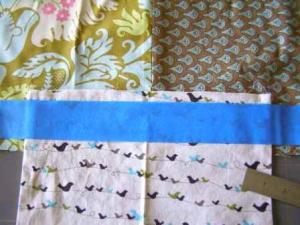
OR, if drawing on fabric is not something you are willing to do, connect the red dots with blue painters tape. Either will work fine.
Sew along the line. The next time you hear someone say “I can’t even sew a straight line!” You can respond, “Where’s your painters tape? – I show you an an easy way!”
Flip pocket back up (remove tape first). Press with Iron. Pin to lining.
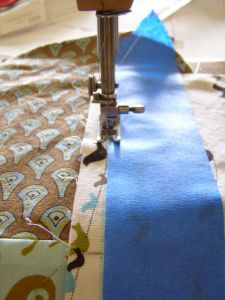
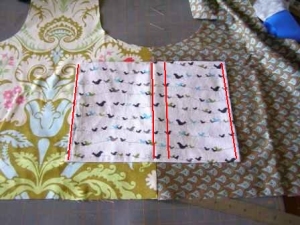
Sew very close to right and left edge, along center fold and 1.5″ left of center fold as shown in Photo 12. Painters Tape will help keep two middle seams straight.
Because this stitching is done on the
top” of the fabric, it is called “Top-Stitching”.
The narrow center section of the pocket is for a pen. The section on the right is a cell phone pocket. Because the pockets are too deep for these items to be easily removed, another top-stitched seam is required.
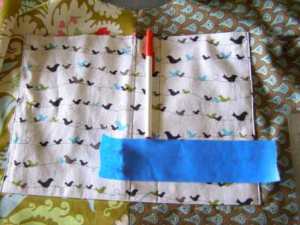
The depth of the pockets can be easily estimated with a pen as shown in Photo 13. Use a piece of Painters Tape to keep seam straight and level. Do not top stitch across the left larger pocket – so it can be used for a larger item.
Now onto the outside of the bag…
Take the pieces that will form the outside of your bag and place them RIGHT SIDES together. Sew them together along the side seam, just the same as the two lining pieces were sewn together in Photo 6.
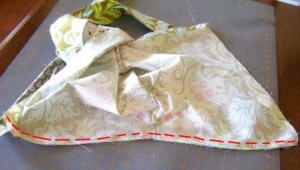
Iron seam open. You will have a piece that looks like Photo 14. The lining should look similar – and should have a pocket!
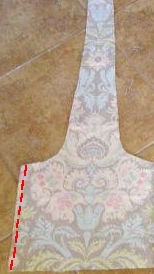
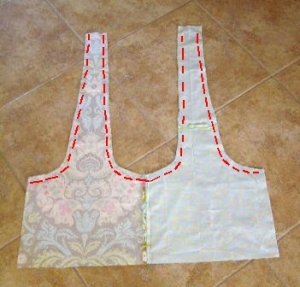
Place the lining on top of the outside pieces – RIGHT SIDES together – and pin together. Sew together along the red dashed lines as shown in Photo 14.
“Clipping” and “trimming” is required when sewing curves, so the curved portions of the seams you just sewed must be clipped and trimmed.
“Trimming” is simply narrowing the 1/2″ seam allowance to 1/4″ by cutting away 1/4″ from the raw edges. “Clipping” is a series of cuts made perpendicular to the seam as shown in Photo 15.
After clipping and trimming, turn the bag right-side out. Press with iron.
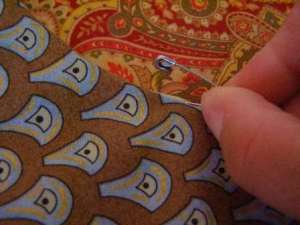
To get seams to press nicely – use a larger pin/needle/safety pin to pull the seam as you press as shown in Photo 16.
Now it is time to sew the other side seam…
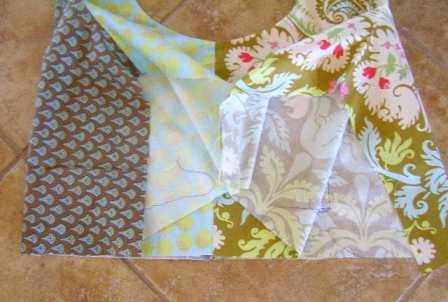
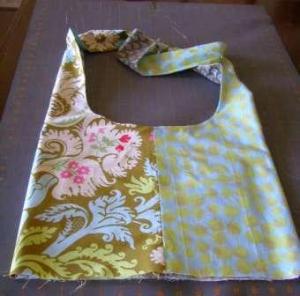
Lay bag on a flat surface as shown in Photo 17.
Bring the two far corners of the outer fabrics together as shown in Photo 18.
Pin those corners together and then pin again approximately 4″ further down unsewn side seam. This is shown in Photo 19.
Continue pinning the side seam together. Match the upper seam carefully.
When pinning is complete, the bag will be inside out and resemble the odd shape shown in Photo 20.
Press seam open. Turn bag right side out. It should start to resemble to Boho Bag at this point..






Pingback: Boho Sling Bag Tutorial: Using “Fat Quarters” | The Destashification Project
Pingback: Tutorial for Boho Sling Bag, Part Two | The Destashification Project
Pingback: Patchy Boho Sling Bag Tutorial | The Destashification Project
Great tutorial, nice bag, thanks for sharing it, we’ve featured today it at Sew-Whats-new.com!
thanx
Pingback: Boho Sling Bag | Free Purse, Bag & Tote Patterns and Tutorials
Great pattern, thanks! It turned out just as I wanted
Brilliant (:
I love this tutorial
I’m on my second bag already 😀
Pingback: Boho Sling Bag Sewing Tutorial and Free Pattern
Nice looking bag, but instructions need to be shortened.
Your bags are gorgeous! Thanks for sharing
I always think these things are simpler than they are! Thanks so much for all the detail – I’m going to tackle these for Chrismas this year. You’res are lovely!
Thank you for sharing.
I love the look of this bag but would like a pattern I could sew a zipper into. Would this pattern allow for sewing a zipper?
Pingback: So, Today I Made a Bag « anonymouse
thanks for sharing!!! i am not a sewer & i have done 3 bags (a bit of help from my husband) my first one i made a bit larger to make a hands free beach bag!! love it
These are amazing thanks so much for sharing! One question though: where can I find the extra steps for the patch bag?
Another question: How can you print it on 400% on word? An error occurs and prints it out regular for me is there any way to fix this?
I have to send the file or take the file to a Kinko’s or other print shop and have them print the larger size. I will try to do a 4-page true-to-size pattern…
Ok thanks for all your help! Taking it to the nearest print shop asap.
I hope I am sending this to the right person. I am starting a sewing class on Tuesday and loved your instructions and pattern for the Boho Sling Bag. So, I went and bought all the materials and then went to office-max to enlarge the pattern 400%. They told me it was going to be about 66 ” long by whatever wide. I believe that would be impossible.That is about 5 feet long! Is the 400% enlargement correct or I am reading something incorrectly?
Thanks for your patience!
Sherry Landau
WOW! One would have to be very VERY tall to carry a 5 foot long purse!
The dimensions of the purse pattern are shown in the second photo on the Boho Sling Bag Tutorial. The long measurement is 38″.
I think the problem may be in the Office Max interpretation of 400%. The printable pattern is 9.5″ long and would require a 4 times multiplier to become 38″ long. However, I have encountered printing shops that calculate enlargement percentages slightly differently (and their explanation makes my head spin)
My recommendation is to show them the printed pattern and the Enlargement Notes in the lower right hand corner. Measurements for the enlargement are explained there – and indicate that the Center Bag Seam (3″ long on the printed pattern) should be 12″ long after enlargement.
Then they can use their calculators – discuss multipliers and percentages amongst themselves – and in the end, hand you an enlargement with a 38″ long length and a 12″ Center Bag Seam.
Hope this helps.
This looks like just what I have been looking for….anxious to get my fabric and pattern together. You did a great job on the tutorial 🙂 Lets see if I can do it.
Pingback: 20 beach or weekend bag free tutorials | a little bird made me
Very Nice blog and post you wrote, love all these bags and bohemian style.
I am visiting from an online shop dedicated to bohemian bags. we love the embroidery details on boho bags, the colors are so bright and beautiful it’s just perfect. The boho fringe bags are simply amazing…. you can see yourself wearing it everywhere and specially at summer festivals, because it can store a lot of things inside and still feel comfortable and stylish, besides, the fringes gives that hippie vibe that you will love so much. All these bags make us feel free to dance all night long without being bothered by our purses. Love love love. Check it out:
http://www.etsy.com/shop/JaipurHandloom
Some bags to look for:
http://www.etsy.com/listing/155628138/banjara-bags-ethnic-bags-gypsy-bags?
http://www.etsy.com/listing/155631446/banjara-bags-ethnic-bags-gypsy-bags?
One question, I’ve made my bag up until the lining base. I clipped the lining and eased the base in, but I’m still not sure I did the right thing. Did I or should I have clipped the base itself? I feel like this is probably a dumb question but being a rooky bag maker….I’m not sure.
I am trying to envision where you are so that I may help.
There is a base in the lining – and a separate base for the outside of the bag. Both bases require clipping to fit to their respective bag bodies.
Let me know if I completely missed on this – or of any other questions.
I love this bag, but I’m limited on fabric right now so I was just wondering how much fabric do you need roughly altogether?
If I remember right, the outer bag requires one yard – which will also be enough for the inner pocket. The lining will require another yard – however, it can be pieced if what you have on hand is less than a yard.
I downloaded all the pattern except couldn’t download the base or bottom of bag, could you tell me what the measuremens are for the rounded rectangle for bottom,thank you in advance. Love your bags.:) ..keep them comingKatie
OK. I think I’ve got it:
1. Use paper to create a rectangle that is 7″ by 12″. This creates the basic base, but the corners for this bag are rounded.
2. Fold the rectangle in half twice – once lengthwise, once widthwise. The folded paper should now measure 3.5″ by 6″.
3. Mark points in both directions 2″ from the corner with cut edges (not a corner that includes a fold).
4. Place a CD or DVD so that it touches both of these marks (most of the CD will be on the rectangle)
5. Trace the edge of the CD between the two marks.
6. Cut along that traced line – the resulting rectangle with curved corners is the pattern piece for the base – it includes 1/2″ seam allowances.
Hope this helps!
Thank you so much!! Yes this does help, I made the bag for my 20 year old granddaughter for her birthday & put a few $ in it, she called me an said i must have been reading her mind she had been going to buy one for college & she said it was perfect, I asked her what she thought my going to be 15 year old would like & she said make her a tote like you made me, she will love it. But I had rearraged my sewing room and must have accidently thrown the pattern i had away. But when I tried to get it again couldnt find the measurements for the bottom, and couldn’t remember. So thank you so much for replying. You are so talented and just love your tuterals & patterns….Katie….God Bless
thank you!
Love it, and made one this evening! Can’t wait to make a few more for gifts! Thanks for the awesome pattern, and very detailed instructions. I’m an avid sewer, but your instructions were perfect for even beginner sewers. Good job!
Pingback: Hobo Bag | Marla's Art Page Blog
Pattern length is 38″ a yard is 36″, wish I had seen this before I bought my fabric. 😦
I am sorry this happened to you. I know how frustrating it can be when something doesn’t work out just right.
I hope this reply is fast enough to ameliorate that frustration – turn the fabric so the long dimension of the bag runs from selvedge to selvedge. The fabric is most likely 42″ – 45″ wide. With a 36″ length, there should be enough fabric to cut two full bag pattern pieces.
Hope this helps – i think I will edit the instructions to be clearer on this – Thanks!)
I love the bag but I am stuck on picture 18-20! I don’t understand how I pin the lining and sew the pieces together. Help please!!!
In photo 18, one seam is sewn – it connects the two bag pieces down the middle of one of the sides of the bag.
The two bag pieces also need to be connected on the other side. When laying the pieces flat as shown in photo 18, the outermost edges are what will be connected to form that seam.
If there was just one layer, sewing the two edges together would seem simple. The only complication comes because there is a lining and the seam continues to sew the lining. It is hard to picture, so I hope this helps.
Lay your bag as shown in Photo 18. Go to the left edge. There will be a top layer and the lining layer – connected at the top by a seam. Slide a piece of scrap paper between the two layers. This should help identify the two fabric layers. Now, using a pen, mark small X’s every 2″ or so right along the left edge of the top layer (make them small enough and very close to the cut edge – about 1/4″ – so that they will not show when seam is sewn). This will help identify what edge is to be sewn. Do the same for the right edge.
Pick up the lower left corner- just the top layer. Pick up the lower right corner- just the top layer. Pin them together – right sides together. Move up the seam to the next X and pin again. Move up 2 more inches and pin again. Move up 2 more inches and pin again. Continue pinning every 2″. Eventually, the paper will fall out and the linings will start to be the fabric you are pining together.
Sew that seam. (Photo 20).
Once that seam is sewn, you should have a “bottomless” bag body – which should form a circle.
Let me know if I can provide any additional help.
Thank you so much,,Awesome ,explanation , . I was stuck here too , back on track now ,, loving this
Pingback: Boho Sling Bag @Love-To-Sew.com
I love this bag – I have just made my 7th and shared it on my blog 😀 60degreesofinspiration.blogspot.co.uk
Have made several of these bags and absolutely love them! A couple things that I changed that I liked. Instead of a smaller inner pocket I cut fabric the same width as the bag and then just sewed the sides into the seams then divided the one big pocket Into three smaller ones by dividing it into thirds and sewing a seam up through the pocket. This also gave the bag a little extra support. For the bottom originally I used an old dish towel but was running out of them so I tried a rectangular felt piece this fit perfectly and added a little more support than the dish towel and in the long run is much cheaper then using dishtowels. Thanks so much for this fun, quick and easy pattern! Everyone I know wants me to make them a purse now!
What great ideas!
The bigger inner pockets make so much sense!
I have also used left over quilting batting for the base – but I think you idea of the felt not only keeps the bag lightweight, but adds the needed support!
Thanks for sharing these great ideas!
Pingback: craftiness and a tribute | Comfy Posy
What are the measurements of the base? I printed out and used the pattern, but it seems too small– when I try to pin it to the lining, there’s way too much lining and not enough base. My base ended up being 9.5 x 6 in. Is that correct?
Oh!! Never mind! I read your response to Katie, above. Got it now!
Pingback: Hobo bag | Banana Productions
does it matter what type of fabric I use?
The type of fabric does not really matter. I have used both very light and very heavy fabrics. However, one suggestion – if using a heavier fabric for the outer layer, I would recommend a lighter fabric for the lining. Good Luck!
Love this bag! I’ve just finished hand sewing one from blue fat quarters, and it looks great! Perfect for a lightweight holiday beach bag!
I used some left over sheeting for the base, just two layers of it to make it a little stronger. It seems to work well, although hand sewing through four layers of cotton fabric was hard work!
Now begins the hunt for some fat quarters in pink! 🙂
Hi! I love this bag but i’m not able to enlarge the pattern to 400% with word…i’m a beginner and non native english. Do you have another pattern file already enlarged?
I am glad to hear you like the pattern.
Please do not try to enlarge the pattern in word. It was intended to be printed out and then taken to a Printer – such as Fed EX Kinko or other location offering enlargement printing.
I hope you are able to have the pattern enlarged and sew the bag!
Thanks I love this ! I may try to make some for my team to hold their items when presenting Younique Products. I’m shades of purple and black . Great pattern !
Purple and Black – how rich! Deep colors are so appealing.
I hope you enjoy making the bags – and the team enjoys using them!
Reblogged this on gottagetagift and commented:
Love this bag! Whether it’s made with several fabrics or one piece, the results truly are groovy boho.
Made myself one of these today – thanks for the pattern! http://extremehousewife.blogspot.co.uk/2015/05/he-man-bag.html
I am new at sewing and I am having trouble figuring out the pocket. The tutorial says to place the folded edge on top and the raw edge will be sewn on the bottom? How will you make use of the pocket if both sides are closed? Please help. My pocket after I sewed it together only has one opening did I sew it wrong?
The finished pocket will be sewn on the left and right sides and the bottom. The folded edge forms the top of the pocket and is left open. It is not sewn to the inside of the bag.
I hope this helps.
I found your tutorial very helpful. I love how easy the bag came together once I sat down and started sewing. Your directions were easy enough to follow that I didn’t feel lost even when I decided to skip certain steps to alter the bag a bit. Thank you so much for posting this! I’ll definitely be using you tutorial again!
Thank you for the nice comment. I hope to be able to create video instructions in the near future so the instructions are even clearer. I know that there are a few tricky steps that a video might help with.
I’ve made this bag before and it was great, but was just wondering if it was possible to add a zipper to the opening for extra security.
A zipper would be a great idea.
I have been attempting to determine how a zipper could be added – easily. So far, all my options seem too complicated. I’ll keep working on it and will post if I come up with something.
Perhaps a toggle button with a latch would suffice until the zipper method is figured out. A really nice varnished piece of driftwood with a small hole gently drilled into it would look amazing with this bag I would think. 🙂
I have looked every where to print off this BoHo Bag, I am making it and wrote off the instructions, but the pictures of each step help, I have to keep running back to the computer to look at the pictures, I started trying to print it but it said 16 pages and I thought this can’t be that many pages. HELP please
16 pages! Boy, that does sound like quite a few.
I have not attempted to print off the instructions, but if your computer is not portable, it may be a good idea.
Perhaps printing at 50% size would reduce the number of pages.
Thanks for the advice. I am about half way thru making this sample Boho bag. I have 2 to make for a customer, she has already given me the fabric she wants them out of, so I told her I would have to make a sample before I started on her expensive fabric. haha I did find out how to print exactly the pages I wanted. She gave me one of her old boho bags to cut my pattern from, It is just sewn across on the bottom without the base. now if I can just get it finished I will be ok, turning out pretty. Just hope I can get this last seam done on the side like it says, . Thanks again very much.
Pingback: Boho bag | drsarahsmith
Is there a way to put a zipper in this to close the bag? I’ve seen them like that on like ebay but I don’t want to pay shipping from India on something I could have a lot of fun making myself. I’m very much a beginner, but I did make a purse before once. Any tips you can give me would be wonderful! I love this bag! I want to try and do one of those hidden zippers (I have no idea what they’re actually called!) like right at the top of the opening. Is this doable? Thank you so much!
I am working on a zippered version of the bag. I hope to have in on the site early in the fall.
Thanks a lot for this tutorial. Very helpfull!
Thanks!
Thank you so much for the tutorial. I needed a bag to wear with my “medieval” costume, got some linen, followed your exellent instructions (mastered even the bottom with the pulling and turning : ) – and there it is, ready to wear on a fair soon. All the best for you all you future projects!
I have a huge stash of fabric, mostly being saved for the right pattern to come along. I used your diagram and measurements to make my pattern. I have now made four bags and they are all lovely. I changed how I did the shoulders – I left them open about 4 inches then joined them together and oversewed them. This has given a lovely finish. I am going to embellish the front of my plain bags with three contrasting buttons
Thanks again from a grateful English sewer
We are Sisters in the Destashification…
Glad to hear you are using your stash for the bags.
I like your idea for the shoulders. Sounds perfect!
Fantastic bag!! I was drawing out a pattern myself when I came across your blog. Thank you sew much much for making it easier!! Your tutorial could not have been any easier/clearer!! I will definitely be making more in the future!
Thank you! This worked great! I made the bag smaller for my daughter so the base was a little tricky – should have just done math to get the circumference right! Ha, but I kept trimming away!
Beautiful
Pingback: This the bag I’m into. – Robinson Crusew
Thank you, love the handbag. Kind of u to share, I am over 70 yrs., have been sewing since I was 12. Now I have time, plan to make some of these for gals that need but can’t afford. Have been passing my ideas along to young ones, the art of creative sewing must continue.
I am going to try this. I hope it goes well. I love these purses and would love to make some for my daughter and friends as well.
lovely idea
This looks like a great pattern.mI want to try using a really cool rice bag I found for the outer layer and some matching cotton for the lining. The rice bag is a woven sort of plastics material. Definitely sew able. Do you see any problems with using 2 different materials? Thanks for sharing your pattern!
love these bags!!!
This pattern looks great! Love the added bottom! Will have to try it soon. I’m also in great need of destashification 🙂 Are the instructions for the pieced version (possibly made w/a charm pack?) available? I read through the comments, but if it’s discussed there, I missed it. Thanks so much!!
Oh, also, is there an easy-to-print version of the instructions? No worries if not, your tutorial here is amazing.
I am academic advisor for a student group that is doing the ‘purse project’, filling used or inexpensive bags with toiletries and other necessities to pass out to homeless women. This is a bit more complicated than necessary for that project, but has gotten me eager to keep learning.