It’s October.
Time for candy corn (best candy ever!) and now that the costumes are done – time to think about sewing gifts for the holidays.
With rotary cutting, straight seaming, foundation piecing, and endless color possibilities, the Destashification Table Runner can be sized to fit any table! A great way to turn Stash fabrics into a beautiful gift in an afternoon!
Update 1/6/12: Less editorialized set of instructions have been added here.
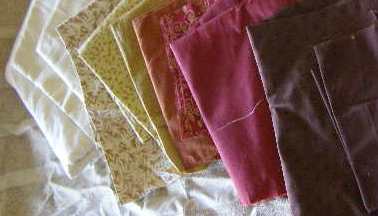
Step 1. Fabric Selection: (this is the best part!) Go through your stash and find 10 – 20 fabrics in your chosen colorway. Line them up from lightest to darkest.
Like this.
There will be one or two fabrics that are just “not right”. Take those out and reform the Line Up.
Like this.
The Line Up still may not be just right.
Collect additional fabrics and try again.
Like this.
Or this.
Until – the flow of colors and patterns of the fabrics just fall into place!
Too many beautiful fabrics and unable to select just 10? No problem: 10 fabric strips = approx. 70″ long runner. If you find it impossible to limit yourself to 10 fabrics, or need a longer runner, each additional strip will add approx. 4.5″ to the length.
Also needed:
- Enough of one of the light colored fabrics selected to create a pieced strip 1.5″ wide by approx. 140″ long for the light colored border.
- Enough of one of the dark colored fabrics to cut a 7.5″ square and two 5″ squares.
- Enough of one of the mid-colored fabrics to cut two strips (pieced) 5″ wide by 60″ long and four strips 5″ wide by 10″ long for the wide border.
- Fabric for the back measuring approx. 80″ long by 24″ wide. This can be pieced.
- An old sheet or old tablecloth (tears and stains will not show) or another piece of fabric the same size as the back that will be used for the foundation fabric (solid light color recommended)
Step 2: Cutting the Design Pieces (also fun!)
The design of the table runner is nothing more than a series of rectangular and square pieces.
From each fabric of the 10 selected fabrics cut two 2.5″ squares and four 2.5″ * 8″ – 9″ rectangles.
Rotary cutting will make this project faster, more precise, and easier – but only if the blade is sharp! New Blade! Dull blades leave little uncut portions and frustration and should therefore be relegated to the recycling bin!
Speaking of frustration, the little creases in fabric can cause problems. To avoid them, iron the fabric prior to cutting. No, really. Just iron it. See Discussion on Ironing below.
With fabrics that are 44″ – 45″ wide, one 2.5″ wide strip can easily be cut into the 4 rectangles and 2 squares (with some to spare).
Speed Sewing: It is possible to layer the fabrics and rotary cut more than one fabric at a time!
Stash fabrics are typically in irregular pieces. Each square and rectangle may have to be cut individually.
Regardless of original fabric size, you will need two 2.5″ squares and four 2.5″ by 8″ – 9″ rectangles of each of your selected fabrics.
Cut a 7.5″ square of one of the darker fabrics for the center square.
Step 3: Preparing the Foundation Piece:
Rip (doesn’t ripping just enpower?) the sheet/table cloth/fabric to be used for the foundation to a large rectangle approximately 24″ by 80″. Solid, light colored old sheets work great for this purpose. Ripping “squares” the fabric along the grain line.
Fold the foundation lengthwise and iron the crease. Then fold it in half width-wise and iron that crease. These crease lines will serve as guides to keep the design straight.
Lay the foundation fabric flat on a surface large enough to lay it flat – a large table or the floor.
Step 4: Sewing the Design:
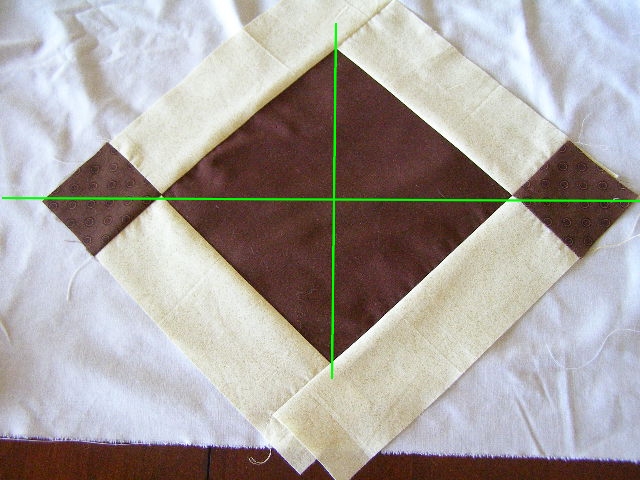
Place the center square on the foundation fabric so that each corner of the square lines up on one of the crease lines. Pin.
Lay out lightest color rectangles and darkest color squares as shown in Photo 1. Note that only the points of the dark squares will touch..
SEAM ALLOWANCE DISCUSSION:
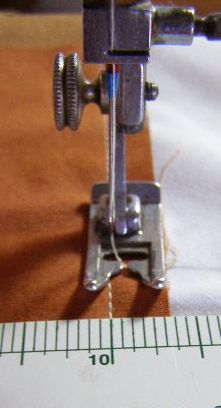
Because of the foundation fabric, it is not possible to use a regular seam allowance guide. The guide would not be visible from under the fabric. However, like most of us, a pressure foot has the ability to multi-task, so let it do the work for you!
Align the edge of the pressure foot with the edge of the fabric. If you have an adjustable position needle, slide it as far to the left as possible.
As shown in the picture, on my machine, this produces a seam allowance of 11/32″ (that is 0.34375″ in decimal form or 13.533465 mm for the metric world!) – but as incalculable as that seems – it works well!
If your pressure foot produces a seam allowance anywhere between 1/4″ to 1/2″ – it is perfect! The precision in the project comes from keeping the seam allowance consistent – so make it simple! Let your pressure foot do all the work!
Back to Sewing!
1. Wind 2 bobbins.
2. Go back and do Step #1.
OK, Now back to Sewing:
Place one set of the light colored strips face down on opposite sides of the center square. Using your pressure foot as a seam allowance guide, sew through the strips, the square and the foundation fabric.
Flip light rectangles right side up and iron.
IRONING DISCUSSION: Foundation Piecing requires ironing every piece open after seaming. If you would like to incorporate aerobic exercise into the making of your table runner, set up your ironing board across the room/house/street from your sewing machine. You will get quite a workout! (Speaking of multi-tasking!)
Back to Sewing:
Sew the dark squares to the two remaining light rectangles using the same seam allowance as shown in Photo 4. Iron seam open.
Place the rect/square set face down on one of the remaining edges of the dark center square.
To keep design straight and square, match seams as shown in Photo 5. Pin. Sew along pink lines using pressure foot as seam allowance guide.
Repeat for remaining side of center square.
Flip strips to right side and iron.
Note that the points of the small dark squares fall very close to the crease lines on the foundation fabric (they are supposed to!)
Congratulations! The first row is complete!
These simple steps are repeated to create the design.


That is GORGEOUS!!! thanks for posting the photos and tutorial!
LC
The runner is fabulous! Thank you so much for the wonderful directions on how to make it! It so helps to have pictures to refer to! Thanks again for sharing your talents with us and have a great day!
Pingback: Destashification Table Runner Tutorial – Part 2 | The Destashification Project
Pingback: Destashification Table Runner – Part 3 | The Destashification Project
It’s beautiful, I imagine many different color schemes.
I’m doing one of these too! I just finished 4 of the boho sling bags, totally love them!!
I have saved this beautiful design and I plan on using it sometime in the new year as a gift for next year – and I thank you so much for the tutorial on how to make it – when I first saw it I just printed the photo not realizing the tutoral was also there for me – so I have now collected those to print out as soon as my cartridge in the printer is replenished – lol – but thank you once again for such a lovely item to add to my patterns.
Pingback: Table Runner Tutorial: The Engineering-Only Version | The Destashification Project