

Arizona Tall Pines
Arizona is – land of deserts and saguaro cactus.
Arizona also has beautiful Ponderosa Pine covered mountains!
This time of year, those mountains are also covered with snow!
Friends invited us to spend some time in their mountain lodge earlier this month.
These simple huck towels were embroidered for the hostess gift. Huck fabric and embroidery thread were found in The Stash.
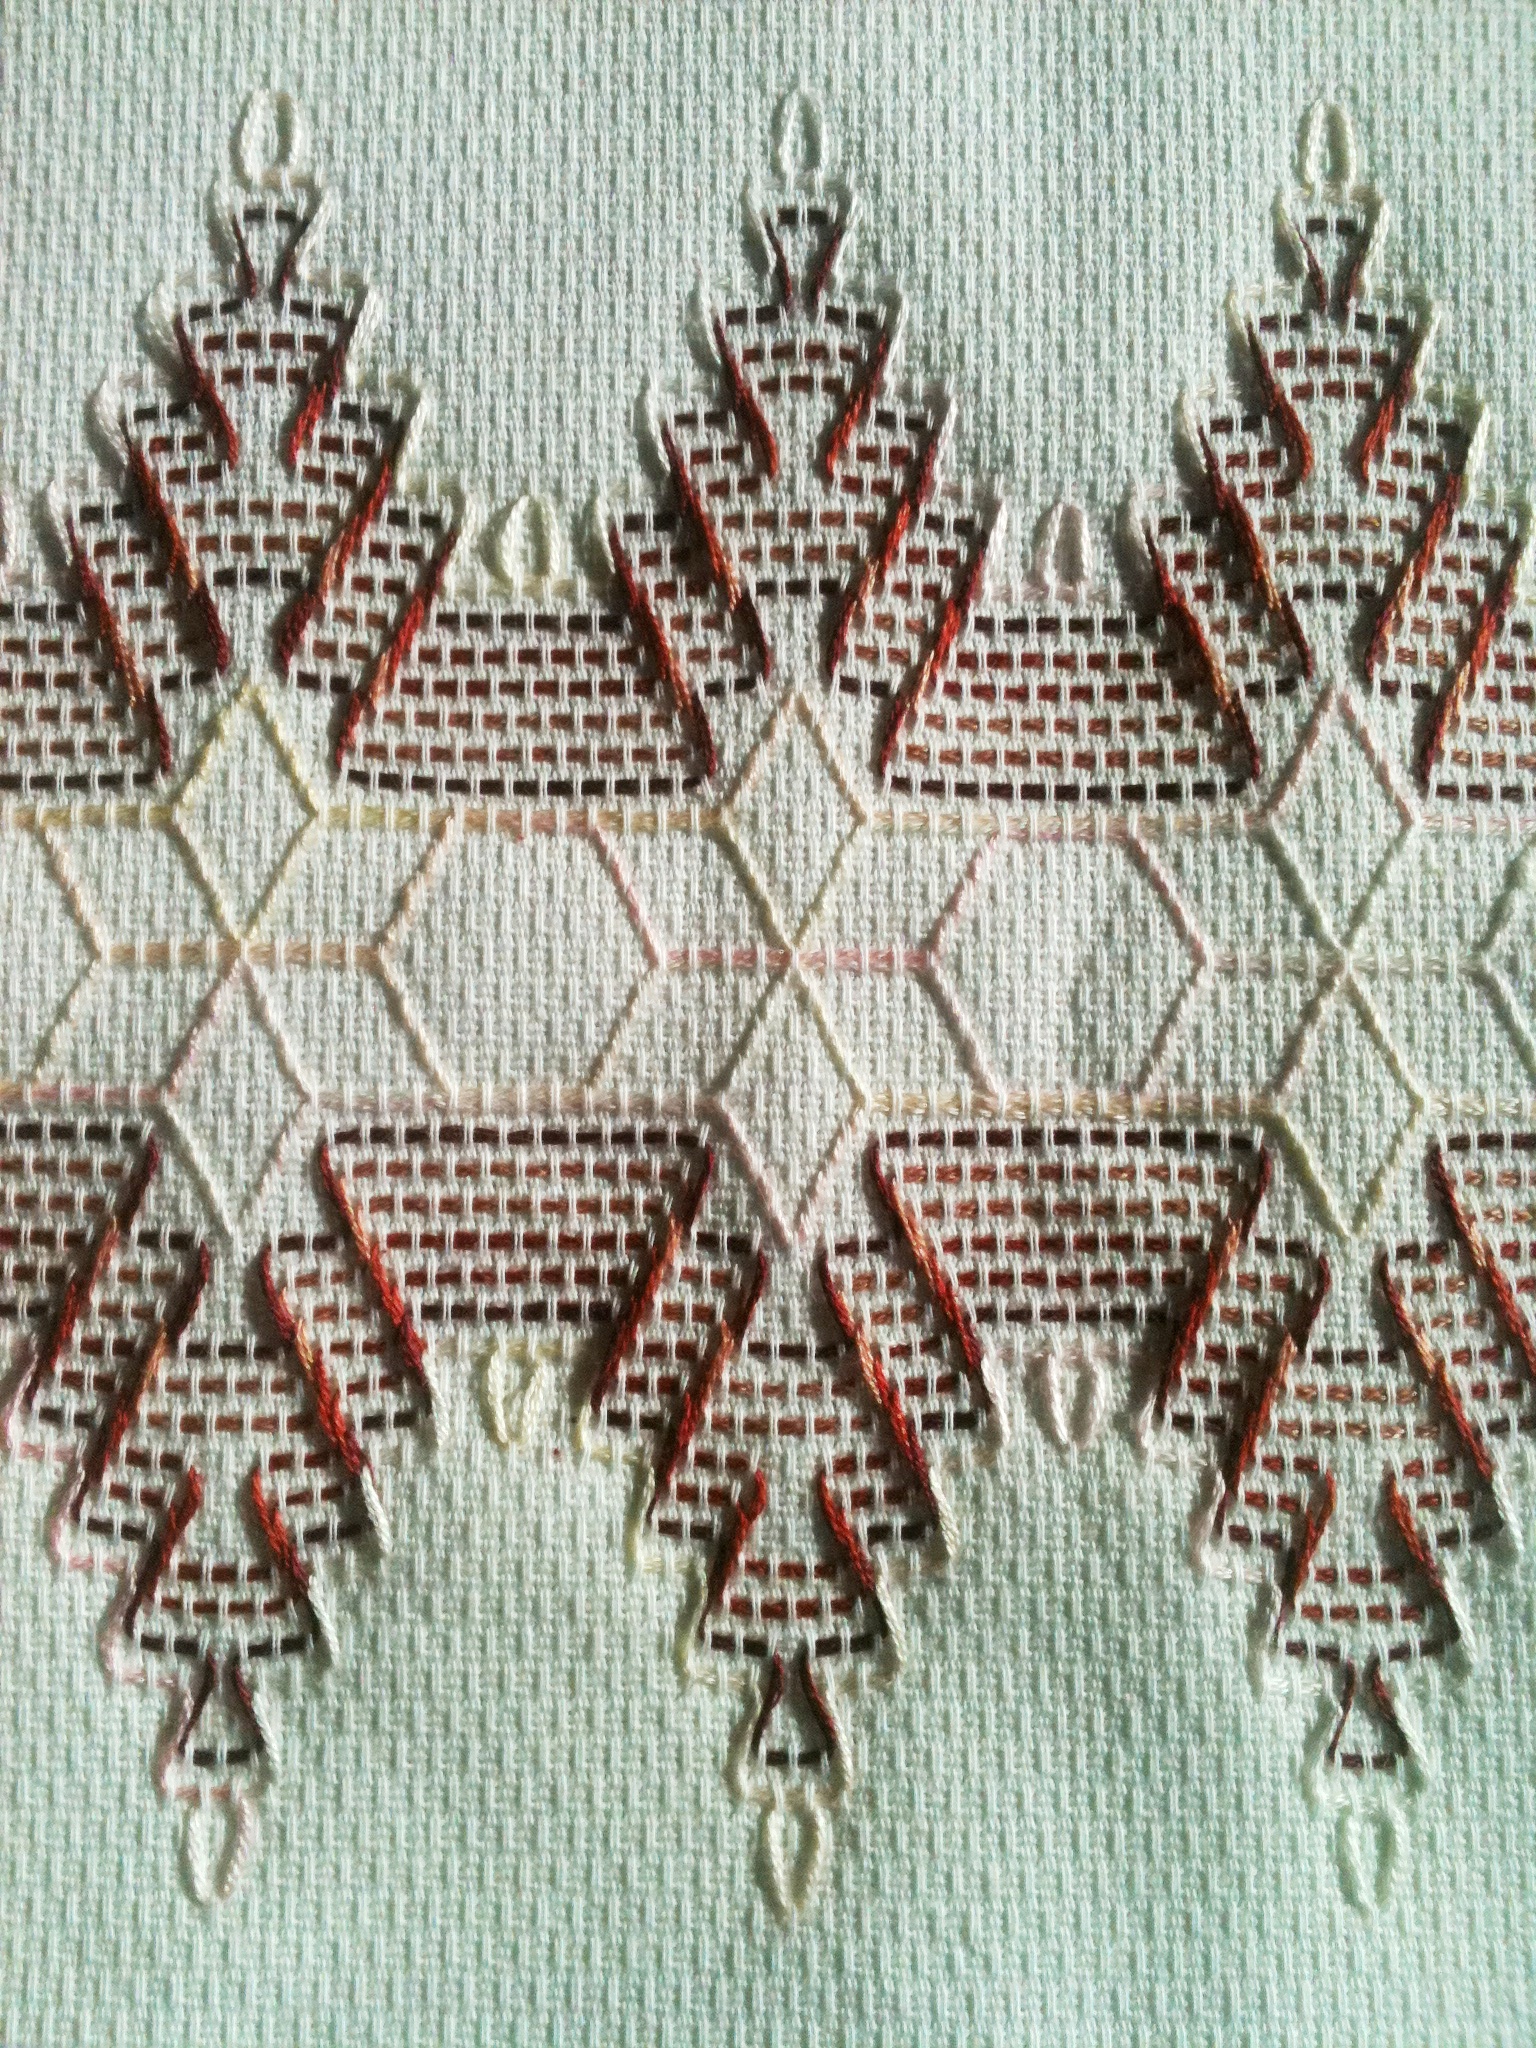
Snowflakes on the Arizona Mountains
The snowflake design is based on Snowflake Design by Mildred V. Krieg (c. 1930-40).
However, it appears the geometry of the floats has changed in the intervening 70+ years. So the the snowflake points had to be redesigned to avoid being skewed vertically.
The mountains of Arizona are browns and reds so were stitched using those colors.
The Arizona Pines used a variety of the green embroidery thread found in the Stash.
Huck Embroidery is quite simple. Threads are run under “floats” woven into the towel fabric. Instructions can be found in an earlier post. Warning: Huck Embroidery is addictive!

Arizona Tall Pines in Huck Embroidery

Snowflakes on the Arizona Mountains in Huck Embroidery

Very nice! Your friend must have really appreciated those.
Absolutely beautiful. I am in awe of anyone who does hand work.
Very cool embroidery. Have visited Arizona once and it was beautiful! I love the red mountains.
Where can I get this pattern?
I really don’t have patterns to send along, as most of the huck towels are stitched with patterns that I make up as I go along. I purposefully included large photos in the blog so that anyone wishing to stitch the towels would be able to follow the stitch pattern in the photos.
Enjoy stitching!
I can remember doing huck toweling in home ec class in school. I have been looking for patterns and material to try it again some 50 years later
I hope you enjoy it as much as I do!
Relaxing, beautiful and useful!
that is beautiful were did you find the pattern snow flakes on the Arizona Mountain’s
The Arizona Pines is a design I came up with on my own. I had included large pictures in the post so that anyone could follow the design. The snowflakes pattern is Mildred Kreig’s. The exact pattern is referenced in the blog discussion. I wish I had created that pattern, but alas, Ms. Kreig beat me to it by over 50 years! (Her books are often available on ebay or etsy.)
Hope this helps!
Hi I have tried to make the Pattern but i am haveing a hard time. it is so i cannot find her books . thank you
Hi there, I am another one who did Huck Toweling as a child back in the late 60’s early 70’s and remember loving it. Recently I came across my box of supplies with a couple of Mildred’s books. However the books I had were the last two in her series of the alphabet. I had lost the first three but was thrilled to find them on eBay & Etsy. I fell in love with the design of Mildred’s that you reworked for your Arizona Snowflakes. I have been trying for,days to figure out the pattern using her photo. I finally gave up and was about to surrender and look for another pattern. The reason I love the pattern so is it matches my bedspread so beautifully. I can’t tell you how thrilled I was to find your pictures and this site. I do have a question about the last row, row 8. Is there any hints you can give me about the stitching in that line. All the other lines I understand. I have printed out your picture which has helped tremendously but I’m just not seeing that last row. By the way I had figured out the first row of Mildred’s but after that I was toast! So thank you!!!! Look forward to hearing from you.
Huck is both fun – and frustrating! I can tell you are experiencing both right now!
Can you tell me which row you consider Row 8? Sometimes I start in the middle and count down and up and other times I start at the bottom or top. Then I think I can hgelp.
Thanks so much for getting back to me. I actually figured out the first set of the diamond shapes. So now it’s the rows in the middle that make up stars. I was counting from the bottom of the picture up. I was always taught to start at the bottom row of a pattern and in the middle of the pattern. Do you understand where I’m having the problem now? I was trying to see if I could send you a picture of my piece but I’m not able to add a picture to this comment. If you can tell me how to send a picture to you I’d be happy to. Thanks again for reaching out to me. Liz
If I understand correctly, you are ready to start the diamonds that are next to the center diamond? the ones that extend to the middle of the snowflake.
I would start my needle at the left angle point in the diamond you have completed – on the left side of the towel. Count over 5 threads and start there. (this is the left “tip” of a new diamond.)
(Note to self: Using ecru thread on white toweling does not have sufficient contrast to see… well… much of anything!)
From this point, work the angle floats (they should mirror the floats used in the angle of your existing diamond). Then work the 5 horizontal floats to the top center point of your existing diamond – and continue on the same horizontal line for 4 more floats which form the arm of the diamond on the right side of your existing center diamond.
Then work the angle arm down to the horizontal threads you worked for the existing center diamond. You will be sewing through the horizontal floats that are already occupied by your center diamond threads. They will “share space” through the 5 floats.
This takes you right back to the starting point for you next snowflake diamond!
I hopes this helps….and you are right! I wish we could have used pictures!